Arduino MEGA auto-reset fix

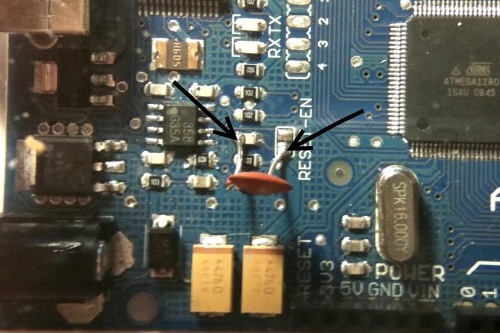
The Arduino MEGA I got had and issue with automatic reset during sketch upload. The error message in the Arduino IDE looked something like this:

<pre>avrdude: stk500_getsync(): not in sync: resp=0x00
avrdude: stk500_disable(): protocol error, expect=0x14, resp=0x51

I had to hit Reset button just before uploading a sketch. This issue was due to some sort of defect in the Reset capacitor. The fix is very simple: just solder a 100nF capacitor on top of the defect one.

(via)

Arduino LED traffic lights

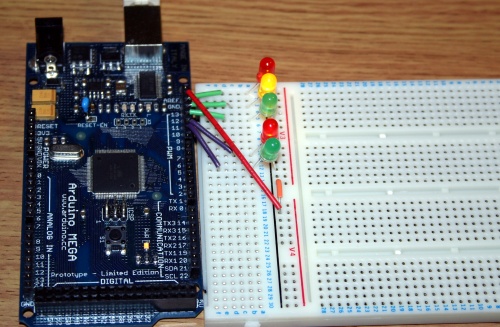
This is a bit enhanced version of the “hello world” blink application for Arduino: traffic lights emulator. The top three LEDs control car traffic and the bottom two are fore pedestrians.

int carRedPin =  13;
int carYellowPin =  12;
int carGreenPin =  11;
int pedestrianRedPin =  10;
int pedestrianGreenPin =  9;

// The setup() method runs once, when the sketch starts

void setup()   {
  pinMode(carRedPin, OUTPUT);
  pinMode(carYellowPin, OUTPUT);
  pinMode(carGreenPin, OUTPUT);
  pinMode(pedestrianRedPin, OUTPUT);
  pinMode(pedestrianGreenPin, OUTPUT);
}

// the loop() method runs over and over again,
// as long as the Arduino has power

void blink(int light)
{
  digitalWrite(light, LOW);
  delay(500);
  digitalWrite(light, HIGH);
  delay(500);
  digitalWrite(light, LOW);
  delay(500);
  digitalWrite(light, HIGH);
  delay(500);
  digitalWrite(light, LOW);
  delay(500);
  digitalWrite(light, HIGH);
  delay(500);
  digitalWrite(light, LOW);
}

void loop()
{
  digitalWrite(carRedPin, HIGH);
  digitalWrite(pedestrianGreenPin, HIGH);
  delay(3000);

  blink(pedestrianGreenPin);

  digitalWrite(pedestrianRedPin, HIGH);
  digitalWrite(pedestrianGreenPin, LOW);
  delay(1000);
  digitalWrite(carYellowPin, HIGH);
  delay(1000);
  digitalWrite(carRedPin, LOW);
  digitalWrite(carYellowPin, LOW);
  digitalWrite(carGreenPin, HIGH);
  delay(3000);

  blink(carGreenPin);

  digitalWrite(carYellowPin, HIGH);
  delay(2000);
  digitalWrite(carYellowPin, LOW);
  digitalWrite(carRedPin, HIGH);
  delay(1000);
  digitalWrite(pedestrianRedPin, LOW);
}

The code above is straightforward: just enabling and disabling LED at certain time. Traffic lights in action:

Arduino and LCD screen

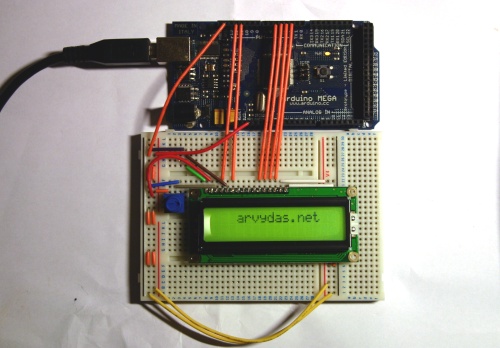
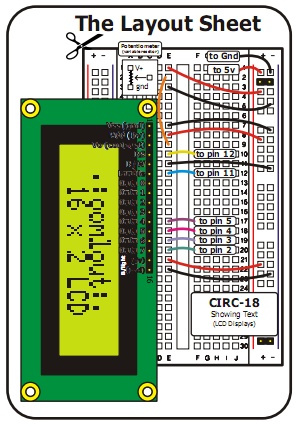
This was one of my first projects to try out various features of Arduino. I got this 2×16 LCD screen from Oomlout. The breadboard schematics came together with the LCD screen and is relatively simple.

Here is the sample code I uploaded to the controller:

// include the library code:
#include <LiquidCrystal.h>

// initialize the library with the numbers of the interface pins
LiquidCrystal lcd(12, 11, 5, 4, 3, 2);

void setup() {
 // set up the LCD's number of rows and columns:
 lcd.begin(16, 2);
}

void loop() {

 lcd.print("                 arvydas.net");

 lcd.setCursor(16,1);
 lcd.autoscroll();

 for (int thisChar = 0; thisChar &lt; 28; thisChar++) {
 lcd.print(" ");
 delay(250);
 }
 lcd.noAutoscroll();

 lcd.clear();
}

Just a simple scrolling text and here is the video:

Robot logic

robot-logic

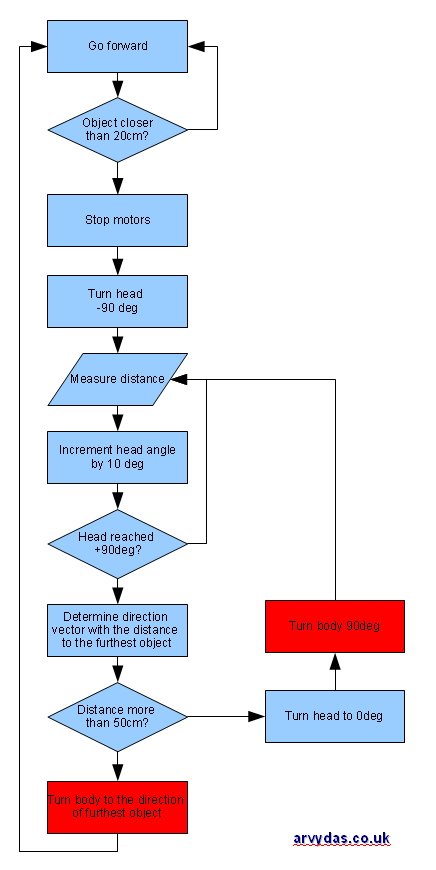
Started thinking about the logic for the robot. The first one that I used in my prototype from LuckyLarry’s website seems to be too basic, so I did a quick brainstorm and came up with the flowchart above.  The logic adds the complexity of using a range finder sensor on top of the servo. Robot should drive forward, unless it encounters an obstacle closer than 20cm. Then it should stop, look around and determine the next free path it should go. The most challenging bits are the ones that I colored in red: this requires some sort of sensory “knowledge” of the direction of the robot. If I had a spare accelerometer, everything should seem more simple: just get the data from the accelerometer and calculate the direction of the robot when it turns. All I have now is just SRF05 range finder so another thought came to my mind. At the point after robot scans the surrounding area, it should know the distance to the surrounding area with 10 degree resolution. For example:

  1. -90 deg | 70 cm
  2. -80 deg | 60 cm
  3. -70 deg | 50 cm
  4. -60 deg | 50 cm
  5. -50 deg | 40 cm
  6. -40 deg | 40 cm
  7. -30 deg | 30 cm
  8. -20 deg | 20 cm
  9. -10 deg | 20 cm
  10. 0 deg | 20 cm
  11. 10 deg | 20 cm
  12. 20 deg | 20 cm
  13. 30 deg | 20 cm

According to the logic, robot should choose path (1) by turning -90 degrees. Considering that before the turning head is facing 0 degrees, it should continue turning, until it determines that the distance is more than 70cm to the closes object, so the range finder should read all the way from 20cm to 70cm with a threshold of +-5cm.

Huh, seems that hardware setup was the easiest bit. Building smart software to run the robot is a bigger challenge and that’s what makes this project so interesting. :)

Hacking a toy car @ fizzPOP Howduino

IMG1716

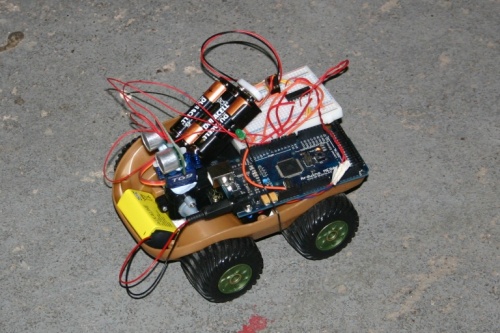
This Saturday I had a chance to attend a fantastic Howduino event in Birmingham – a one day hackers workshop. This was my first experience in this type of event, so I came without any expectations. :) Once the the welcoming announcements were made everybody started hacking either by going to beginners workshops or working on their own projects. Steward from Kre8 joined me at my desk and we had a lot of fun working together.

The task

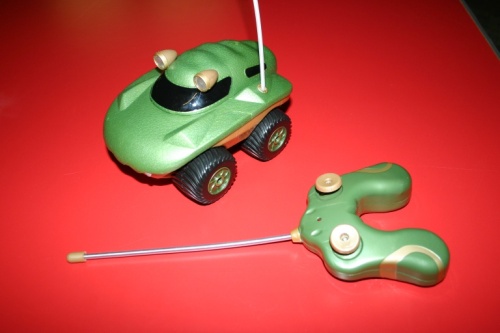
My task for the day was to transform this R/C toy car from ELC into an obstacle avoiding robot.

IMG1710

I chose this cute little toy, because each side of the wheels is controlled by a separate motor. This allows the car to turn around 360 degrees in one spot. There was one big challenge involved in hacking this toy car: I had to be able to assemble it back again, because my son had already announced the ownership. :) Continue reading “Hacking a toy car @ fizzPOP Howduino”

Welcome!

Hello and welcome to my new blog arvydas.co.uk!

Let me quickly introduce myself. I am Arvydas – a software developer and electronics hobbyist based in Hertfordshire, UK. I was born in Lithuania and just a few years ago moved to work in UK. I have been into software development for more than 15 years and have significant experience in PHP, Ruby on Rails, C# (Mono/Microsoft.NET) and Delphi. I am a huge fan of Open Source initiative and love Linux even though my primary desktop is Windows due to the majority of my day-to-day work involved in the latter OS. Quite recently I got a chance to work with Arduino open source hardware and was very impressed by the openness and easy of use of the platform.

I am not new to blogging and have been writing arvydas.net in Lithuanian, but decided to finally spread my thoughts to a wider audience in English. :) So what can you expect to find here? Just on top of my head in no particular order the topics might be:

  • Software development in general;
  • Arduino and other electronics projects;
  • Development with Ruby on Rails and C# languages;
  • Life in UK;
  • Whatever interesting is on my mind at the moment.

Thanks for visiting and I hope you will find something useful here. :)